


The G4X JZX100 Plug-in ECU has two CAN buses. These CAN buses exist to support aftermarket CAN devices.
CAN bus 1 is not connected externally anywhere.
The RS232 Plug pinout is:
RS232 Connector |
||
Pin |
Function |
Colour |
1 |
Comms GND |
Brown |
2 |
nc |
Green |
3 |
nc |
White |
4 |
RS232-RX |
Grey |
5 |
RS232-TX |
Yellow |
CAN 2 on the JZX100 is used to transmit the ECT value to the temperature gauge in the vehicles dash and this value is also used by the AC system. When first receiving your G4X JZX100 ECU the CAN 2 will be set up already but should something change and you need to restore the CAN 2 setup to original, complete the following steps:
1.Connect your laptop to your ECU with the USB communications cable and turn the ignition to the ON position.
2.Start PCLink for G4X and press F3 to connect to the ECU. When the ECU is connected the status bar in the top right corner will be green.
3.Select ECU Controls > CAN Setup.
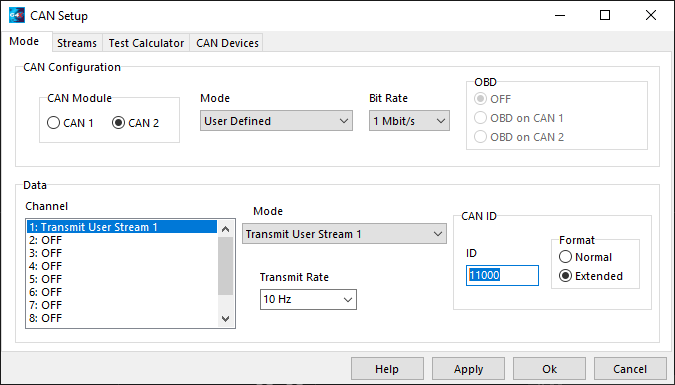
4.Select the CAN Module 2, set the Mode to 'User Defined' and the Bit Rate to 1 Mbit/s.
5.Now select CAN Channel 1 and configure its mode to 'Transmit User Stream 1', set the Format to Extended, the ID to 11000, and the Transmit Rate to 10 Hz.
6.Change to the Streams tab of the CAN Setup window
7.Select Stream 1 and click the 'Load Stream' button. Navigate to your PCLink install directory and select the CAN sub-directory, choose 'Link G4X JZX100 Plugin Transmit' and click the Open button.
8.Click the Apply button and then the OK button
9.Press F4 to perform a 'Store' upon your ECU.
To learn more about CAN see PCLink help.