


This topic is a step by step guide for setting up closed loop boost control system to run up to 220kPa of absolute boost pressure.
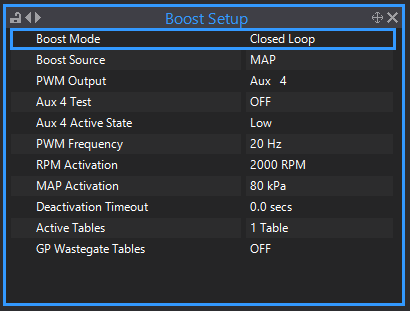
1.Set the Boost Mode to Closed Loop.
2.Set the PWM Output and PWM Frequency
3.Set the RPM Activation and MAP Activation points. Typically 2000RPM and 80kPa.
4.Set the Deactivation Timeout to 0.0s.
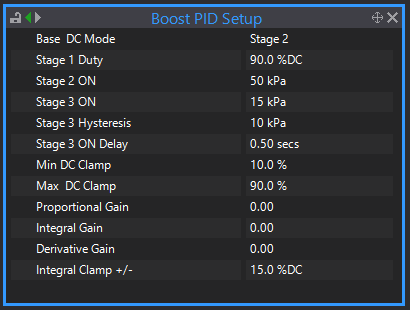
5.Set the Base DC Mode to Stage 2.
6.Set the Stage 1 Duty to 90%.
7.Set Stage 2 ON to 50kPa
8.Set Stage 3 ON to 15kPa
9.Set Stage 3 Hysteresis to 10kPa
10.Set Stage 3 ON Delay to 0.5s
11.Set Max DC Clamp to 90%.
12.Set the Proportional Gain, Integral Gain and Derivative Gain to 0.
13.Set Integral Clamp +/- to 15%.
14.Zero ECT, IAT and Gear Target Trim tables.
15.Zero Gear and ECT Wastegate Trim tables.
16.Set IAT Wastegate Trim table to remove some duty cycle when cold. E.g. -12%DC @ 0 degrees, -8% @ 10, -6% @ 20, -4% @ 30, -2% @ 40 and 0 @ 50.
17.Configure your Boost Target Table as a 2D table with Engine Speed on the X-Axis. Set all of the cells to 180.
18.Configure your Wastegate %DC Table 1 as a 3D table with Engine Speed on the X-Axis and Boost Target on the Y-Axis. The Boost Target axis numbers must range over the variations in boost targets required. E.g. 180, 200 and 220kPa.
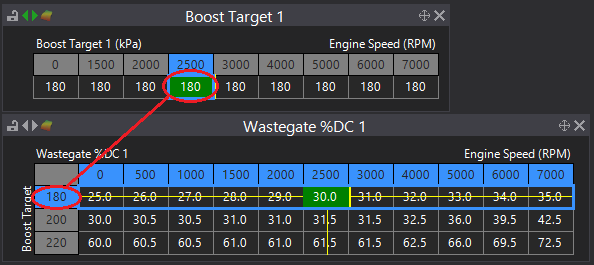
19.Run the engine and tune the row in the Wastegate %DC Table 1 relating to a target of 180kPa. Adjust the duty cycle numbers in this row to achieve 180kPa of boost pressure across the RPM range.
20.Increase all of the values in the Boost Target Table to 200.
21.Tune the row in the Wastegate %DC Table 1 relating to a target of 200kPa. Adjust the duty cycle numbers in this row to achieve 200kPa of boost pressure across the RPM range.
22.Repeat steps 14 and 15 for 220kPa. (Hint: If the engine was already running open loop boost control, existing numbers could be used in the appropriate row.)
23.You will now be able to adjust the Boost Target Table values to anything between 180 and 220kPa and find the engine runs boost pressures close to the specified target.
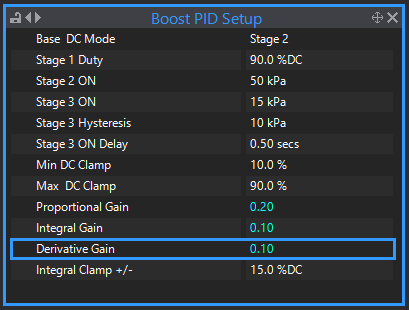
24.Closed loop control can now be enabled. Apply very soft PID settings. P = 0.2, I = 0.1 and D = 0. 1.
25.Test control at different targets, see how closely the actual boost pressure follows the Boost Target pressure.
26.Adjust PID numbers and stage activation pressures to optimize control. Check the Boost Control Settings topic for hints on adjusting different parameters.